
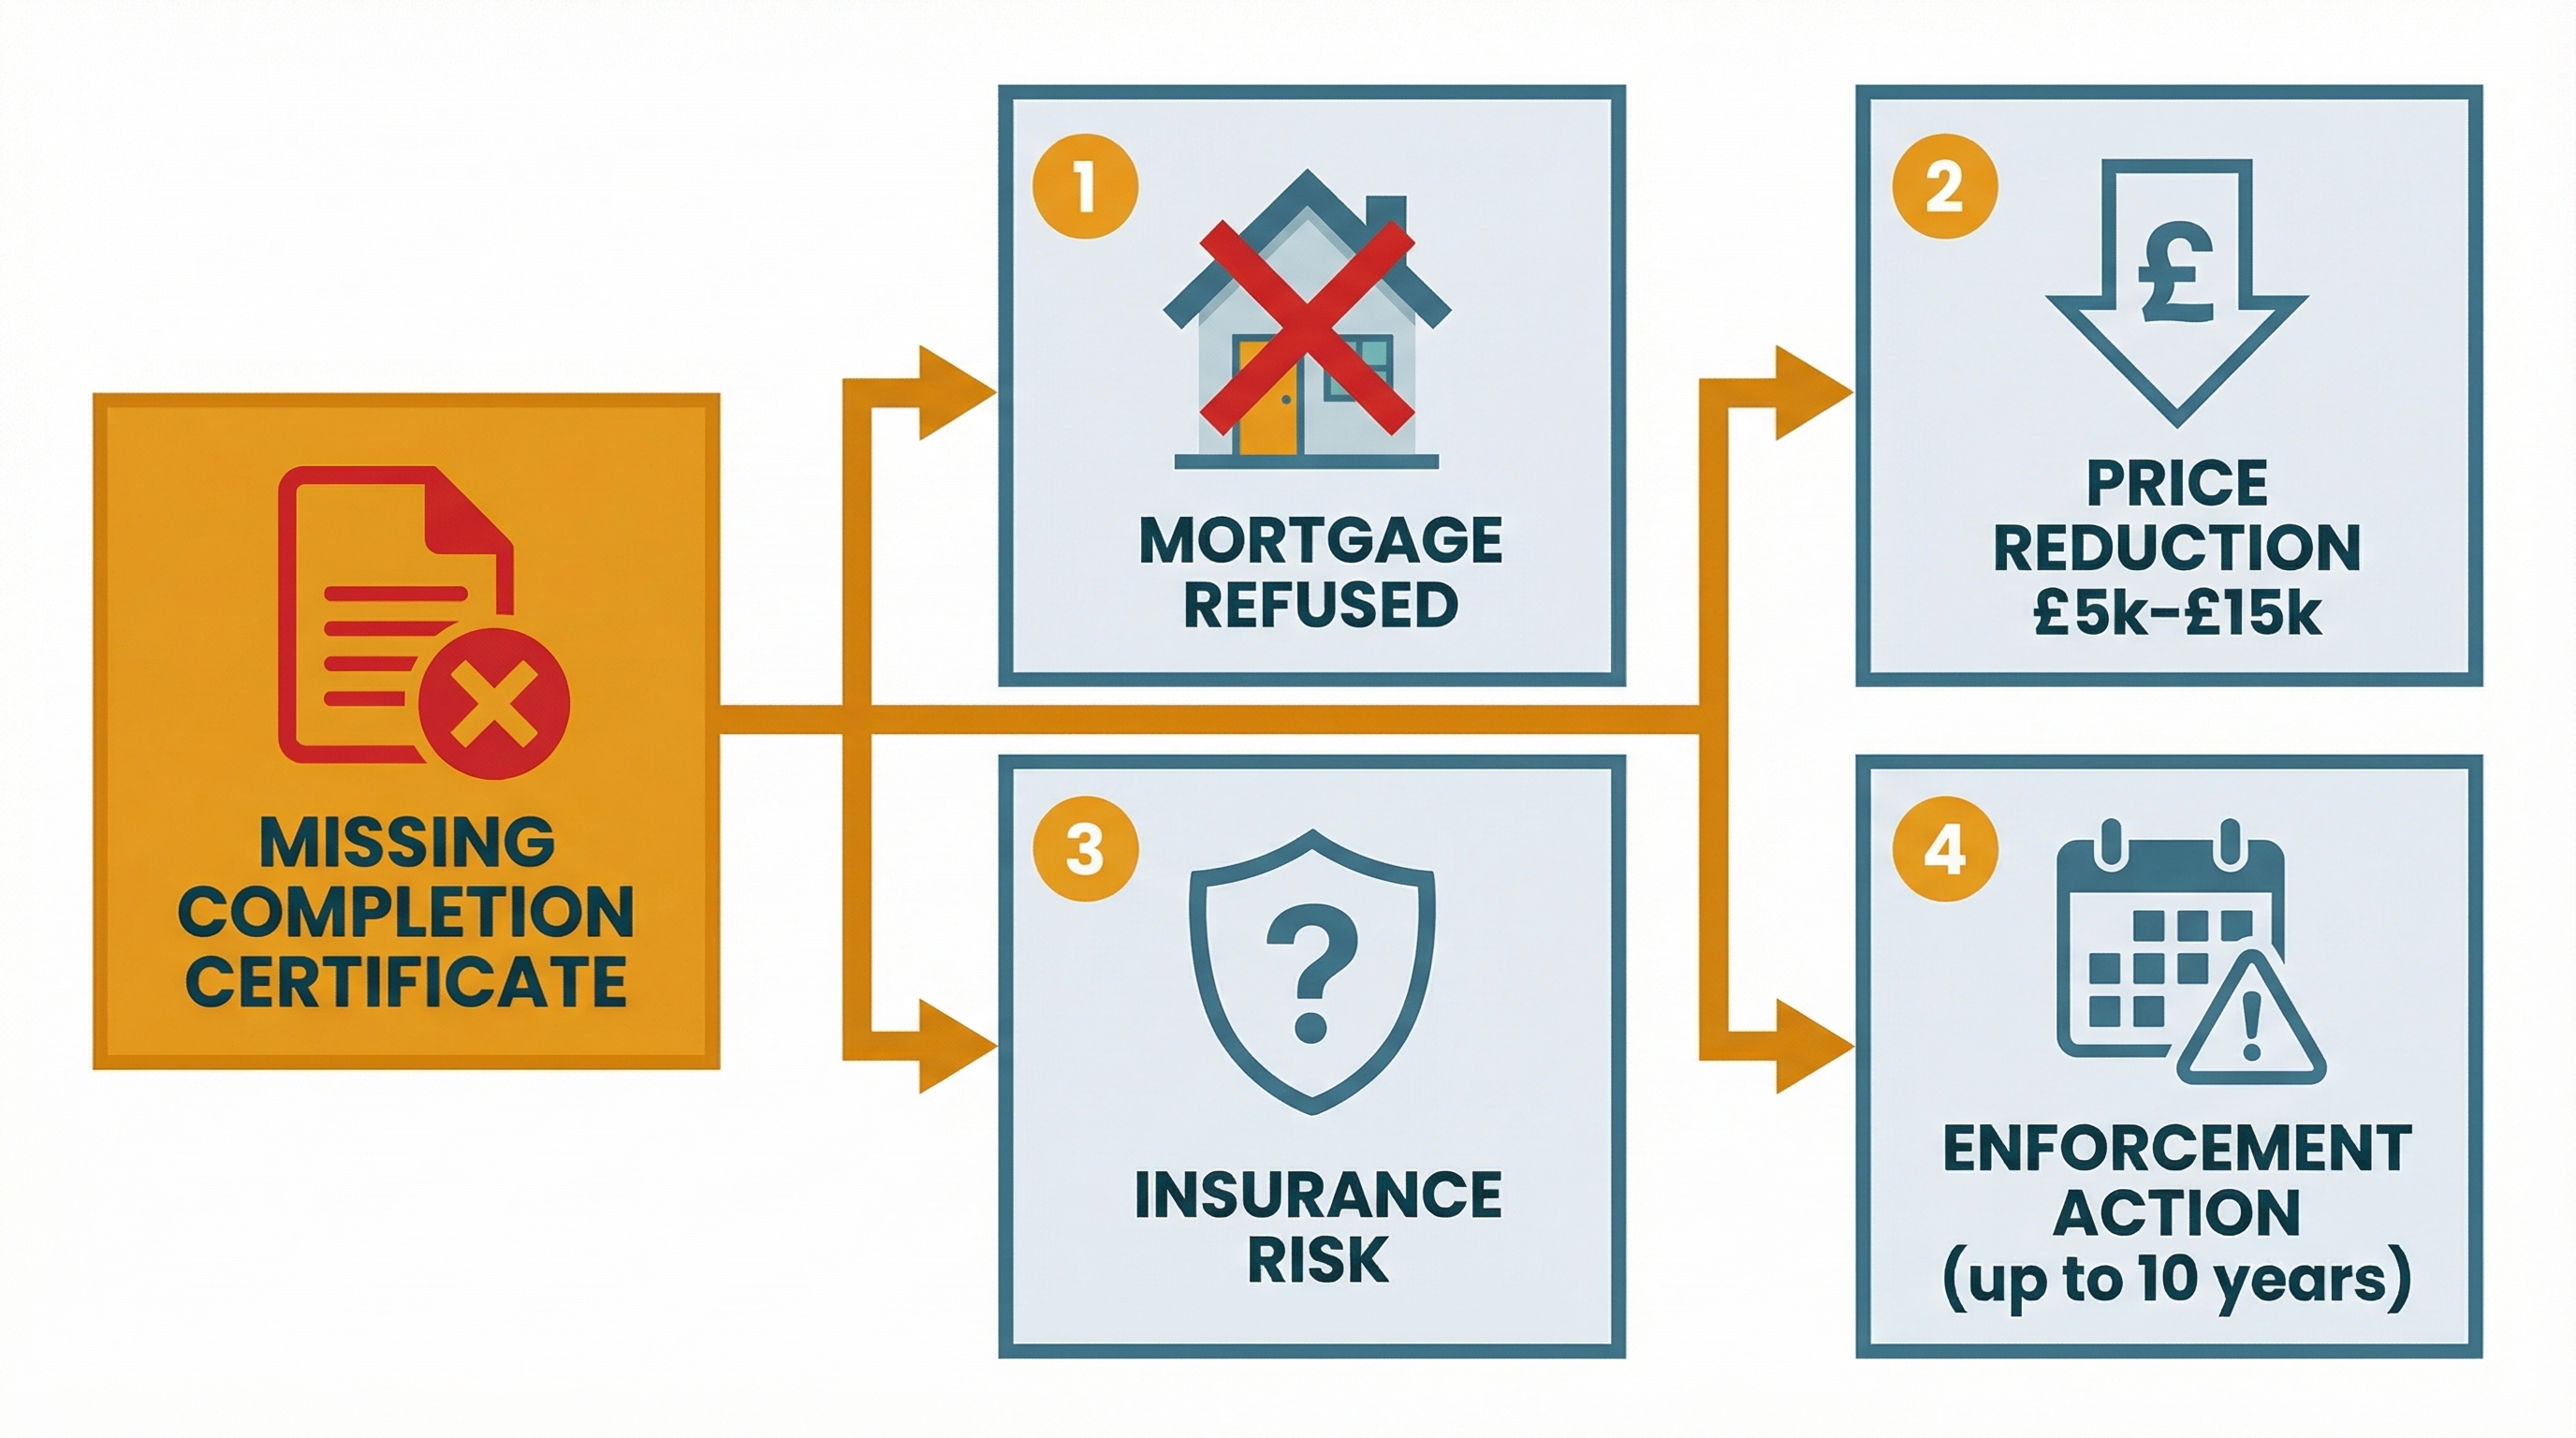
A missing completion certificate can knock £5,000 to £15,000 off your property value. Mortgage lenders refuse to lend. Buyers renegotiate or walk away. And the council can take enforcement action for up to 10 years after work finishes.
That certificate comes from building control. Getting it means passing every inspection stage during your build. Failing to book an inspection, or covering up work before the inspector has seen it, creates problems that are expensive and sometimes impossible to fix after the fact.
Building control is one of the parts of an extension project that worries homeowners most, and the worry is usually worse than the reality. The process is straightforward if you understand what happens at each stage and what the inspector needs to see. What follows is every inspection stage, what the building control officer checks, what you need to have ready, and what to do when things go wrong.
Building Control Is Not Planning Permission
This trips people up constantly. Planning permission and building control are separate systems run by different teams, even within the same council.
Planning permission controls what you build and where: the size, shape, height, and position of your extension relative to boundaries. You deal with a planning officer.
Building control controls how you build it: structural integrity, fire safety, drainage, insulation, ventilation, electrical safety. You deal with a building control officer (BCO). Even if your extension falls under permitted development and doesn't need planning permission, it still needs building control approval. There are no exceptions for domestic extensions.
Our tree guide on building control notification covers how to set up your building control application. The rest of this post focuses on what happens once work starts.
Full Plans vs Building Notice: Pick the Right Route
You have two ways to apply for building control approval. The choice matters more than most guides suggest.
| Full Plans | Building Notice | |
|---|---|---|
| What happens | Submit detailed drawings. BCO reviews and approves before work starts. | Submit a notice. Work can start 48 hours later. No advance plan review. |
| Approval time | 5 weeks (or 2 months by written agreement) | 48 hours |
| Protection | Strong. Section 36 enforcement cannot be served on approved work. | Weak. Council can require alteration or removal for up to 10 years after completion. |
| Best for | Any extension with steelwork, drainage changes, or complexity | Simple internal alterations with an experienced builder |
| Cost | Similar total fee (split into plan charge + inspection charge) | Similar total fee (combined charge) |
| Risk | Low. Problems identified on paper, not in wet concrete. | High. Discover non-compliance on site, at your expense. |
Use Full Plans for your extension. The 5-week wait is time you'd spend getting quotes and sorting party wall agreements anyway. Full Plans gives you two things a Building Notice doesn't: certainty that your design is compliant before the first spade hits the ground, and legal protection against retrospective enforcement under Section 36 of the Building Act. If a BCO approved your plans and you built to them, the council cannot later demand you pull the work down.
Building Notice is for experienced builders doing straightforward work. If you're self-managing your first extension, Full Plans removes a layer of risk you don't need.
There's also a third route: Regularisation. This is retrospective building control approval for work that was done without any application. The council charges about 50% more than the standard fee, may require you to open up finished walls for inspection, and has no obligation to approve the work if it doesn't meet current standards. Avoid needing this.
Who Does the Inspecting?
Two types of building control provider can inspect your extension in England:
Local Authority Building Control (LABC) is your council's in-house team. They operate on a cost-recovery basis (not for profit), and they're the default option for most homeowners. Your architect or builder will have worked with them before.
Registered Building Control Approvers (RBCAs) are private companies. They replaced the old "Approved Inspector" system in 2024. They can charge commercial rates and are often faster to schedule, but you're paying for that speed. Expect 10-20% higher fees. Some builders prefer private inspectors for the scheduling flexibility. Others prefer them for less scrutiny, which is not a good reason.
For most single-storey extensions, LABC is the right choice. The fees are lower, the officer knows local ground conditions and drainage, and you get the backing of the local authority if something goes wrong later.
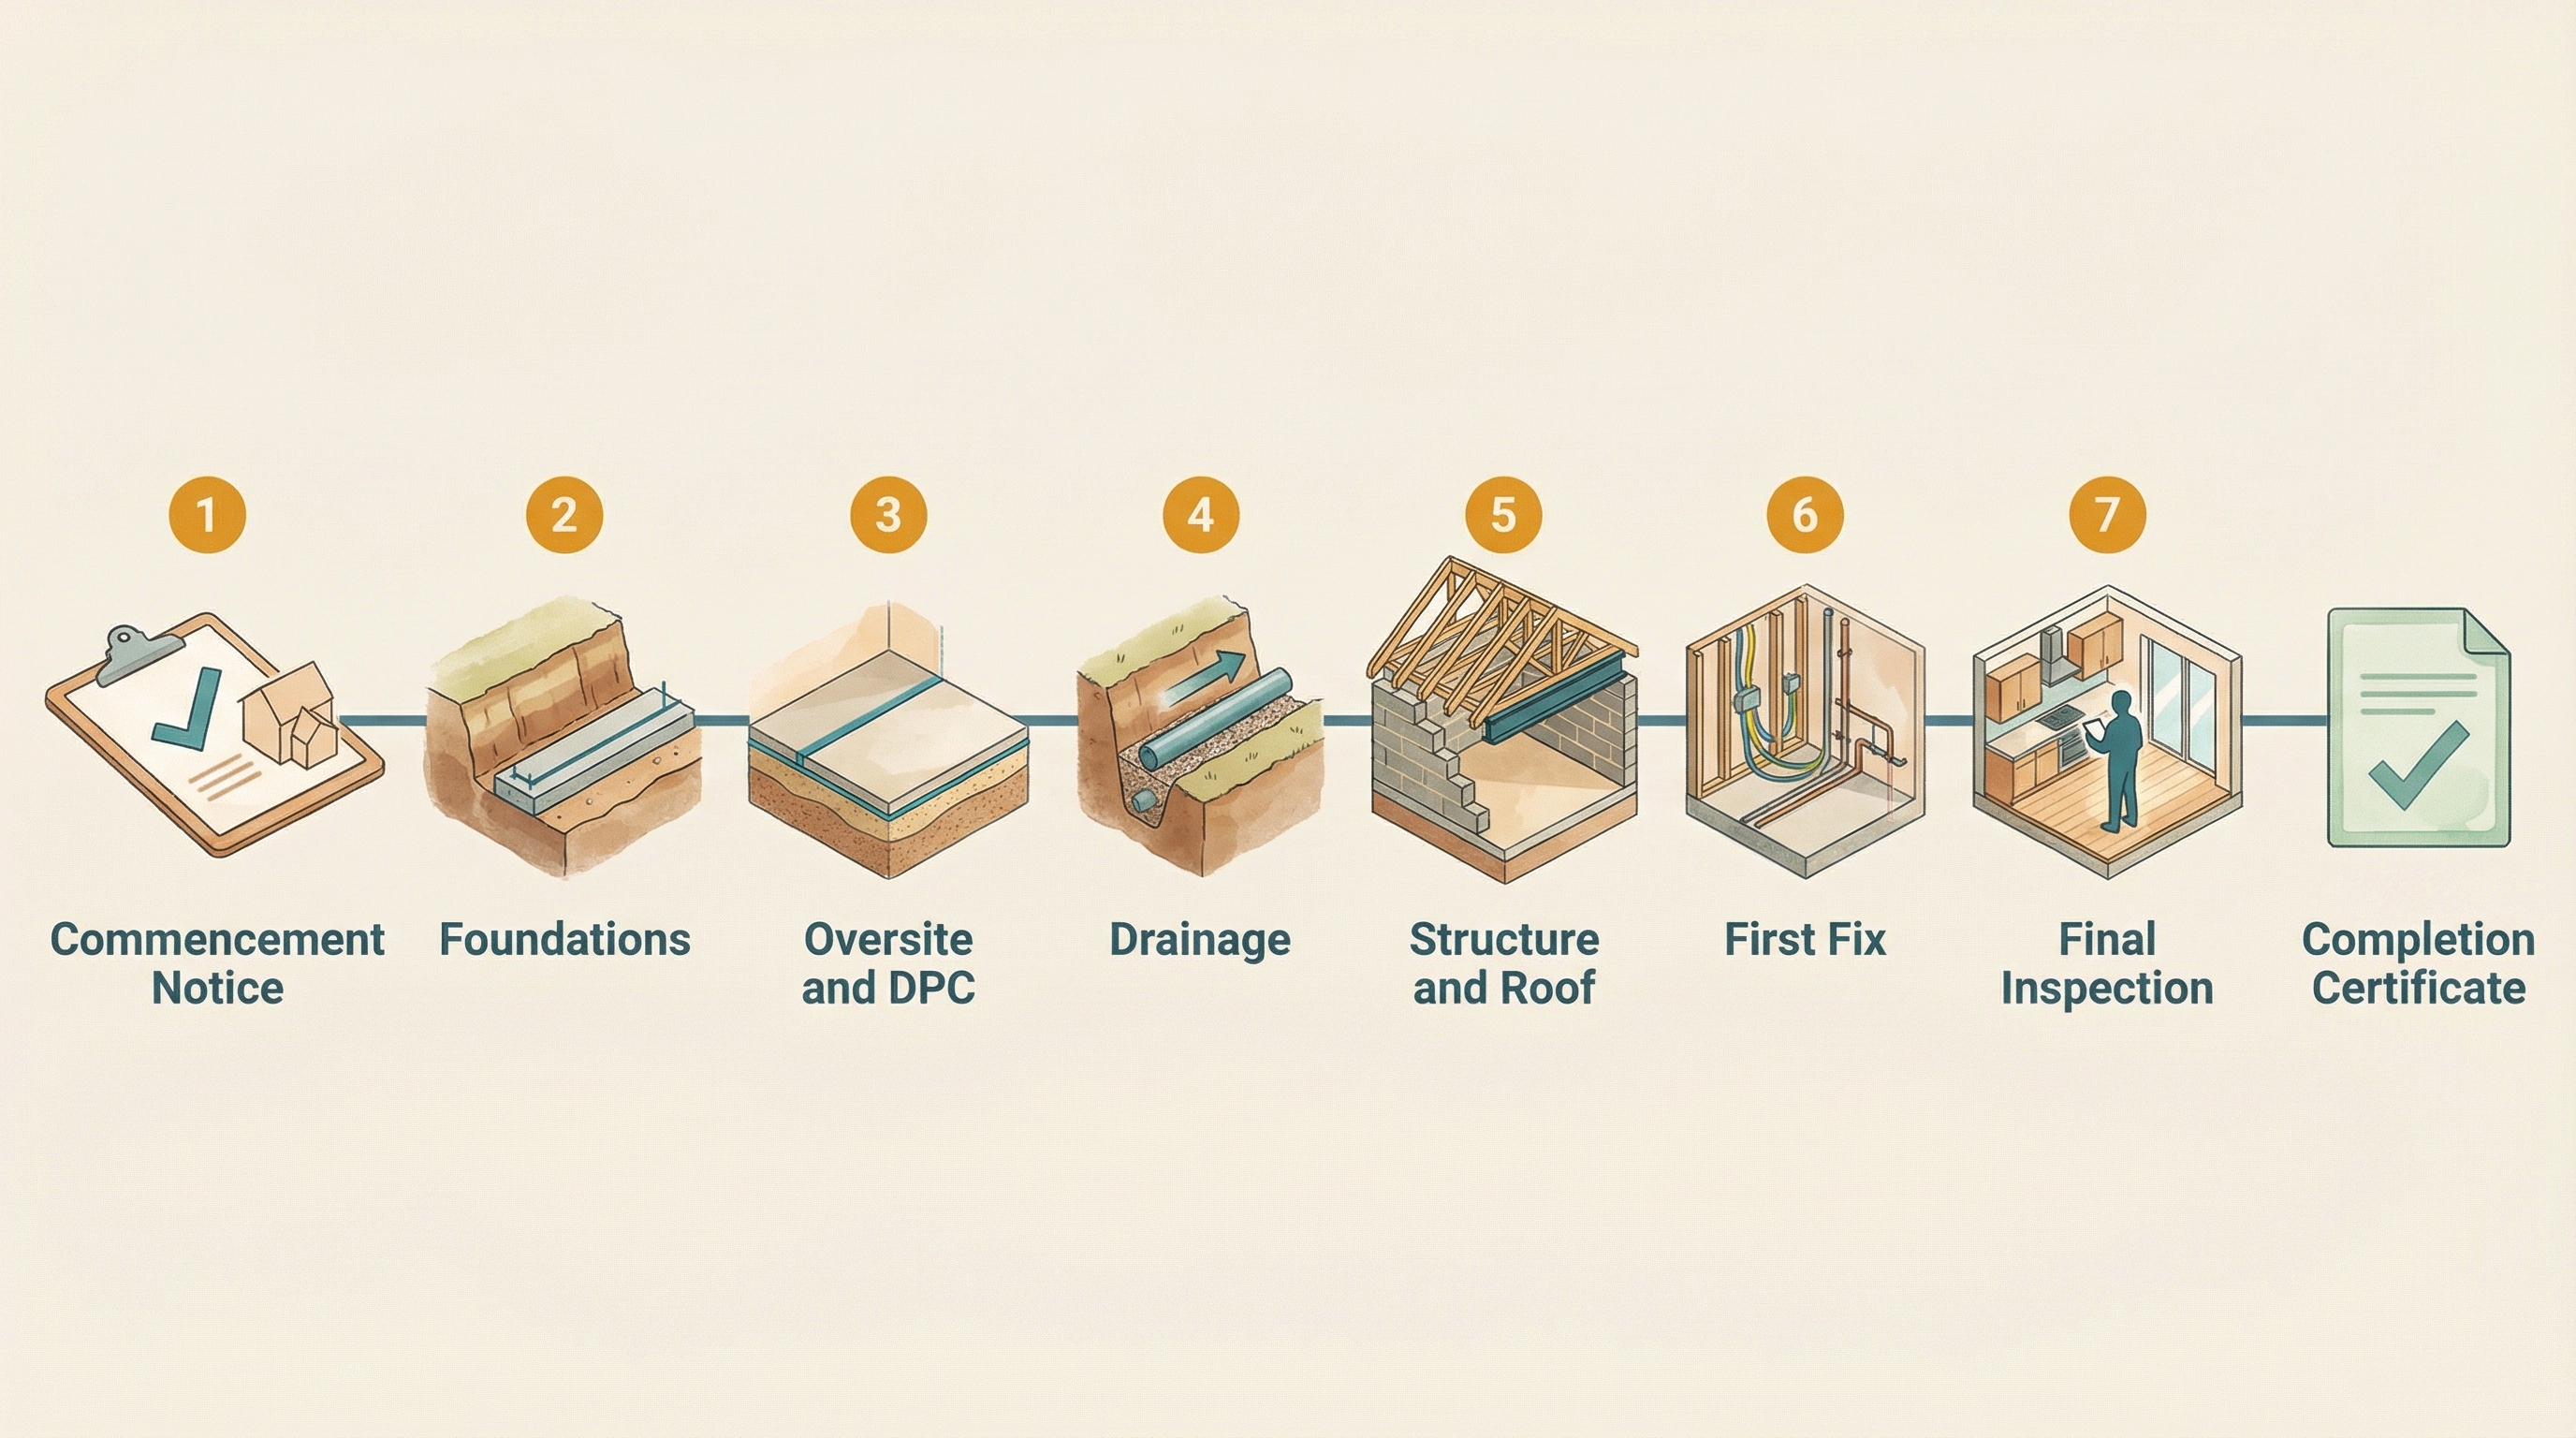
The Seven Inspection Stages
Your BCO will typically visit your extension at seven key points during construction. Some councils list more stages, some list fewer, but the substance is the same. The number of site visits included in the standard fee is usually four to five. Your inspector will combine stages where it makes sense for your project.
The critical rule across every stage: do not cover up, backfill, or concrete over work until the inspector has seen it. If you do, they can require you to expose it again. The costs are substantial, and the delays are worse.
Our tree guide on what building control inspects gives a broader overview. Below is the practical detail for each stage.
Stage 1: Commencement Notice
You must notify your BCO at least 48 hours before work starts on site. This is a legal requirement under Regulation 16 of the Building Regulations 2010.
Phone or email your building control department. Give them your application reference number, the start date, and your builder's name. Some councils have online booking systems. Most are perfectly happy with a phone call.
This first contact sets the tone for the whole project. The BCO will want to discuss the inspection schedule, agree on how you'll book future visits, and confirm the approved plans are on site. Have a set of approved drawings available for the builder and the inspector.
Stage 2: Foundations
This is the most critical inspection. Get it wrong and the financial consequences are severe.
The inspector needs to see the foundation trenches after they're dug and before any concrete goes in. They check trench depth and width against the structural engineer's specification, examine the ground conditions at the base of the trench (bearing capacity, whether the soil is the right type to support the building), and look for complications like tree roots, old drains, or contamination.
Give at least 48 hours' notice. Many councils can do same-day inspections if you call before 10am, but don't rely on this for foundations. Book in advance. Your builder should know the trenches will be ready a day or two before they actually need to pour concrete.
What to have on site: structural engineer's calculations, approved drawings, and your builder. The inspector may want to discuss ground conditions with whoever dug the trenches.
Our tree guide on foundations inspection covers this stage in full detail, including what "good ground" looks like and what happens if conditions are worse than expected.
Stage 3: Drainage
All new or modified drain runs must be inspected before they're backfilled. Drainage is laid as part of the groundwork phase, before the floor slab goes down — which is why this inspection comes before the oversite. The BCO checks pipe material, diameter, gradient (typically 1:40 for 100mm pipe), bedding material, and the position of access chambers.
The key event at this inspection is the drain test. Your builder runs a pressure test while the inspector watches. There are two types:
- Air test: a manometer shows at least 75mm of water gauge pressure maintained for 5 minutes
- Water test: water level loss is monitored over 30 minutes. Maximum permitted loss is 0.15 litres per square metre of pipe surface
If the drain test fails, nobody is pouring concrete over those pipes until it passes. Failed joints are the most common cause. Your builder fixes the joint, re-tests, and the BCO witnesses again.
Our tree guide on drainage and oversite inspection covers drainage standards, test procedures, and common failures.
Explore the full Kitchen Extension Guide
Every task, in the right order, with tools and materials guidance.
View the GuideStage 4: Oversite and DPC
This inspection covers the damp-proofing and floor preparation before the concrete slab is poured. With drainage already laid and inspected, the groundwork team can now prepare the floor build-up.
The BCO checks:
- DPC (damp proof course) is installed at the correct height on the walls, at least 150mm above finished ground level
- DPM (damp proof membrane) on the floor is the right material, with joints properly sealed and lapped
- Hardcore beneath the slab is the correct type and properly compacted
- Sand blinding (around 50mm) provides a smooth bed for the DPM
- Insulation type and thickness meet the Part L requirements. The current U-value target for floors is a maximum of 0.18 W/m2K. Have your insulation product data sheets available.
- Radon barrier if your property is in a radon-affected area
This is another hold point. Do not pour the oversite slab until the inspector has signed off on all the layers beneath it. Correcting problems under a poured slab means breaking it up and starting over.
Stage 5: Structure and Roof
Once your walls, steelwork, lintels, and roof structure are up but before they're boarded or insulated, the BCO visits to check structural compliance.
They're looking at:
- Steel beam sizes and bearing lengths match the structural engineer's specification
- Padstones are correctly positioned under beam bearing points
- Lintels over window and door openings are the right size and type
- Timber joists are the correct grade (C16 or C24 markings visible), span, and spacing
- Lateral restraint straps tie the roof and walls to the existing structure
- Cavity barriers and fire stopping at junctions between old and new construction
- Wall ties connecting the inner and outer skins of cavity walls
This is the inspection where having your structural engineer's calculations on site really matters. The BCO is checking the as-built structure against those calculations. If your builder has deviated from the approved design (different steel size, different joist spacing, timber where steel was specified), this is where it gets caught.
Our tree guide on structure inspection covers what "compliant" looks like for each structural element.
Stage 6: First Fix and Pre-Plaster
This is the biggest single inspection. Everything that's about to disappear behind plasterboard needs checking now.
The BCO inspects:
- Electrical wiring routes, cable types, and containment
- Plumbing pipe runs and pipe sizes
- Insulation in walls, roof, and any remaining floor areas. Wall U-value target: maximum 0.18 W/m2K. Roof: maximum 0.15 W/m2K.
- Cavity closers around window and door openings
- Ventilation provision under Part F
- Fire stopping between the extension and the existing house
- Sound insulation at party walls (if your extension shares a wall with a neighbour)
Have your insulation product specification sheets available. The BCO will check the product, thickness, and installation quality against the Part L energy targets. If your insulation is wrong or poorly fitted, fixing it after plasterboarding means stripping everything back.
Stage 7: Final Inspection
Notify your BCO within five working days of the work being finished. The final inspection is the most document-heavy of all the stages.
The BCO checks everything against the approved plans and collects certificates from the specialist trades:
- Electrical Installation Certificate from a Part P registered electrician (NICEIC, NAPIT, or ELECSA). If your electrician is not registered with a competent person scheme, building control will need to inspect the electrics separately (and charge for it).
- Gas Safe certificate if any gas work was done (boiler installation, gas pipe modifications, hob connection)
- Above-ground drainage and a final drain test
- Safety glazing in doors and low-level windows (check for BS EN 12150 markings on the glass)
- Ventilation is functional (extractor fans running, trickle vents open)
- Fire detection (smoke and heat alarms in the correct locations)
- Air permeability test certificate, if your extension requires one. This applies to larger extensions or those with substantial glazing that triggered a full SAP energy calculation. Your BCO will have told you at the planning stage whether this is needed.
If everything passes, you get the completion certificate.
5 days
What Happens If You Fail an Inspection
An inspection failure is not unusual. BCOs are building enthusiasts, not adversaries. Most "failures" are minor: an insulation product that's 10mm too thin, a missing cavity closer around a window opening, a restraint strap that needs repositioning. Your builder fixes the issue, you rebook, and the inspector comes back.
Serious failures are rarer but more consequential. Structural steel that's the wrong size, foundations that don't reach adequate bearing ground, drainage that repeatedly fails the pressure test. These require professional input (your structural engineer, a drainage contractor) and can add weeks and real cost to your programme.
The worst scenario is work that was covered up without inspection. If the BCO couldn't inspect the foundations because concrete was poured before they visited, they may require you to dig test holes through the finished slab to check what's underneath. If they couldn't inspect drainage because it was backfilled, everything comes up again.
Protect yourself in writing. After every inspection, email your BCO to confirm what was inspected and what was approved. A simple message: "Confirming today's inspection of the foundation trenches. You confirmed the depth and bearing capacity were satisfactory and gave approval to pour concrete." This creates a written record. It protects you if the inspector changes, goes on sick leave, or if there's a dispute about what was agreed. This is not paranoia. Forum threads are full of homeowners who lost money because a substitute inspector retroactively rejected work that the original inspector approved verbally on site.
Self-Certification: When You Don't Need a Separate BCO Visit
Certain specialist trades can "self-certify" their own work under Competent Person Schemes, which means they notify building control directly and issue their own compliance certificate. You don't pay a separate building control fee for that element, and the BCO doesn't need to inspect it independently.
The schemes that matter for extensions:
Gas Safe Register covers all gas appliance installations, boiler commissioning, and gas pipe work. Your gas engineer must be Gas Safe registered. They issue a certificate directly. You still need to provide this certificate to your BCO at the final inspection.
NICEIC, NAPIT, ELECSA (Part P electrical) cover notifiable electrical work: new circuits, rewires, and new circuits in kitchens or outdoors. If your electrician is registered with one of these schemes, they self-certify. If they're not registered, any new circuit work requires a separate building control notification and inspection. This is an important question to ask before you hire an electrician.
FENSA and Certass cover replacement windows and doors in existing buildings. This is a common misconception that catches people out: FENSA does not apply to windows installed in a new extension. Your extension windows fall under the building control application for the extension itself. FENSA only covers like-for-like replacements in existing walls.
HETAS covers solid fuel appliances (wood burners, biomass boilers). If your extension includes a wood burner, a HETAS-registered installer self-certifies.
Get notified when new sections land
We're publishing new guides as they're finished. Join the list to find out when yours is ready.
Building Control Fees
Fees vary between councils, and the gap is wider than you'd expect. The figures circulating in older online guides (£300 to £800 for an extension) are mostly outdated. Current local authority fee schedules for 2025/2026 show higher totals.
Here's what four councils charge for a single-storey extension under 40m2, as of their most recent published fee schedules:
| Council | Total fee (inc VAT) | Notes |
|---|---|---|
| Oxford City Council | £1,125 | Combined fee (Full Plans or Building Notice) |
| Sevenoaks District Council | £1,020 | Full Plans: £360 plan + £660 inspection |
| Bath & NE Somerset | ~£696 | Application charge only (exc VAT shown as £580) |
| Liverpool City Council | £1,128-£1,626 | Range reflects sub-categories within the band |
For a typical single-storey extension under 40m2, budget £900 to £1,250 including VAT. Extensions over 40m2 cost more. Multi-storey extensions cost more again.
If you use a private RBCA instead of your local authority, expect fees 10-20% higher, though you may get faster scheduling in return.
Regularisation (retrospective approval for uncertified work) costs about 50% more than the standard fee and is VAT-exempt. The council fee alone runs [Unknown price: regularisation-fee-extension], but the total cost including opening-up work and professional reports pushes it to [Unknown price: regularisation-total-extension].
Booking Inspections: The Logistics
The practicalities of booking are simple but easy to get wrong.
Notice period. At least 48 hours before commencement. For subsequent stage inspections, most councils can attend same-day if you call before 10am, but don't rely on this for critical stages (foundations and drainage). Book these at least 48 hours ahead.
Who books. The property owner is legally responsible for notifying building control at each stage. In practice, many builders book inspections themselves because they know the timing. That's fine, but confirm it's been done. A builder who "forgot to call building control" before pouring concrete creates your problem, not theirs.
Availability. Building control officers aren't available every day. Some councils inspect Monday, Wednesday, and Friday only. Others have fuller schedules. Ask at your commencement visit what the inspection days and times are.
Communication between visits. Good BCOs welcome photos between inspections. Text or email pictures of work as it progresses. This builds confidence and occasionally catches problems before they become expensive. Ask your inspector if they're open to this.
Number of visits. A single-storey extension typically involves four to six inspection visits. The standard fee covers this. If your project needs more (complex drainage, structural changes during the build), there may be an additional charge per visit. Ask your council what they charge — it varies.
The Completion Certificate: Why It Matters
When your extension passes the final inspection, building control issues a completion certificate. This is the single most important document from your entire build. Keep it with your property deeds. You will need it.
Mortgage lenders require it. When you sell, the buyer's mortgage lender will check for a completion certificate on any extension or structural alteration. Nationwide has refused to lend on properties with missing certificates. Other lenders do the same.
Conveyancing solicitors search for it. Local land searches reveal building control applications and whether a completion certificate was issued. A missing certificate gives the buyer leverage to renegotiate or walk away.
Insurance companies may need it. Some home insurers ask about building work and whether it was signed off. Uncertified work can affect your cover.
Enforcement. The council can take enforcement action under Section 36 of the Building Act 1984 for up to 10 years after completion (amended by the Building Safety Act 2022, in force from October 2023). They can require you to alter or demolish non-compliant work. If you don't comply, they can do the work themselves and recover the cost from you.
If you're buying a property with a missing completion certificate, there are two routes: regularisation (the council inspects the existing work, possibly opens up walls, and certifies it if compliant) or indemnity insurance (a one-off policy costing [Unknown price: indemnity-insurance-no-completion-certificate] that protects against enforcement action but does not make the work compliant). These two routes are mutually exclusive. Once you contact the council about the work, you cannot take out indemnity insurance. Once you take out the insurance, contacting the council voids it.
Our tree guide on building control final inspection covers the final stage in full detail, and the completion certificate guide explains the document itself and what to do if yours is missing.
Regional Differences
Everything above applies to England. Wales, Scotland, and Northern Ireland have separate building control systems with different terminology, different fee structures, and (in Scotland) no option for private inspectors. If you're building outside England, contact your local authority building control department directly. The inspection stages cover the same ground, but the administrative process differs.
The Summary
Building control is not something that happens to your project. It's a process you manage, just like every other part of the build. Book inspections on time. Never cover work before the inspector has seen it. Keep written records of every visit. Chase trade certificates the day the work is finished. And keep that completion certificate safe.
The process works in your favour. Every inspection is a checkpoint that confirms your builder is doing the job properly. When the BCO signs off a stage, you have independent confirmation that the work meets the regulations. That's worth more than the fee.
Explore the full Kitchen Extension Guide
Every task, in the right order, with tools and materials guidance.
View the Guide